Overview
Full disk encryption protects the data on your device in the event it is lost or stolen. Without full disk encryption, if the data drive in the computer is removed, the data can be easily read and accessed. When correctly deployed, full disk encryption requires unauthorized users to have both physical access to your device as well as the password in order to decrypt the data on your device.
However, if both the password and the recovery key are unknown or lost, the device cannot be decrypted and the data will be unrecoverable. It is strongly recommended that you store your passwords and recovery keys in a password manager app like LastPass to avoid this issue.
Full disk encryption should be implemented for all portable devices when:
-
Storing or processing Institutional Information classified at P3 or higher
-
External requirements mandate the use of full disk encryption (such as research Data Use Agreements with third-party data providers).
University-Managed Computers
If you have a University-managed device and do not have administrator privileges on your device, utilize the BigFix Self Service offer for encryption (using instructions for Windows or instructions for macOS). If you encounter any difficulties with the self-service offer or these instructions, contact IT Client Services or your departmental IT support for assistance.
Personally-Managed Computers
For personally-managed computers, see the instructions below for enabling full disk encryption on Windows and Mac computers.
Enable Full Disk Encryption on Microsoft Windows
BitLocker
Microsoft includes a full disk encryption feature built into Windows called BitLocker.
BitLocker is available on supported devices running Windows 10/11 Pro, Enterprise, or Education edition. It is not available on Home edition. Students, faculty and staff can upgrade their Windows 10 system to the Education edition.
User Experience
Many newer computers have a built-in encryption chip that unlocks your encrypted files when you log on.
If your computer does not have an encryption chip, you will have an extra verification step on startup before you can log on. This verification step is only required on startup; once verified, you can log on and out of your user account as normal.
Once logged on, navigating folders and saving files will remain the same.
Find out the operating system edition
Settings > System > About > Listed under Windows Specifications
Which version of Windows operating system am I running?
Example from Windows 10:

Enable BitLocker
Enabling BitLocker will require administrator privileges. If you have a university-managed device and do not have administrator privileges on your device, utilize the BigFix Self Service offer for encryption. If you encounter any difficulties with the self-service offer or these instructions, contact IT Client Services or your departmental IT support for assistance.
ISO recommends that you use a standard user account for all day-to-day activities and elevate to admin privileges only when needed. This process can be performed from a standard user account and will prompt for privilege elevation when needed.
You can use your computer while the drive is being encrypted, but you will need to reboot the computer once the encryption process is complete.
Instructions to turn on device encryption for Windows 10 and 11.
If an error message is displayed (No TPM chip error):
Your computer may display an error message that says "This device can’t use a Trusted Platform Module. Your administrator must set the “Allow BitLocker without a compatible TPM” option in the ‘Require additional authentication at startup’ policy for OS volumes."

The TPM is the encryption chip that allows user accounts to unlock the drive upon startup.
If you get the error message, your computer was made without an encryption chip and you can use a USB or PIN as a substitute.
Steps
This process will require logging onto an administrator account.
Log on with an administrator account > Start > Windows System > Run > gpedit.msc > navigate to Computer Configuration/Administrative Templates/Windows Components/BitLocker Drive Encryption/Operating System Drives > Require additional authentication at startup (right click/edit or double click) > Enable > Check Allow BitLocker without a compatible TPM > Apply
- Go to Start > Windows System > Run

- Rungpedit.msc

-
Navigate to Computer Configuration/Administrative Templates/Windows Components/BitLocker Drive Encryption/Operating System Drives > Require additional authentication at startup (right click/edit or double click)

- Enable > Check Allow BitLocker without a compatible TPM > Apply

Once these steps are complete, try again to turn on BitLocker by following the earlier steps:
Open File Explorer > This PC > Local Disk (C:) > Manage [Drive Tools] > BitLocker > Manage BitLocker > Turn on BitLocker
You will be able to choose between creating a PIN or USB flash drive to unlock your drive at startup. Once you have picked an option, there is no way to switch without decrypting then re-encrypting the drive.
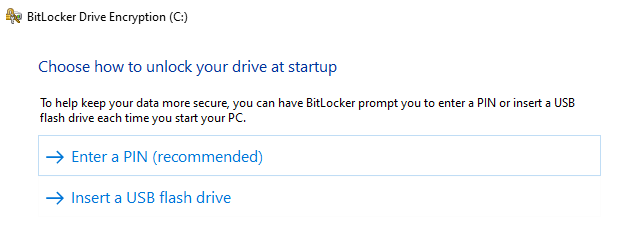
Every person that uses the computer will need to know the PIN or have a copy of the USB flash drive.
Utilizing either of these options requires a person to be physically present for startup; if you are managing your system remotely (e.g. through RDP), a person with the PIN or USB must go in person to decrypt the drive before remote functions can be used.
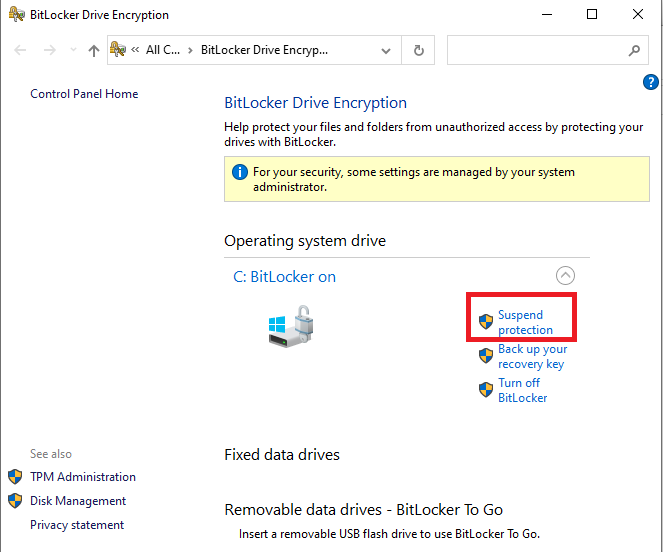
If you have planned updates that require a reboot of the computer, you may follow the instructions below to suspend BitLocker. BitLocker will re-enable after the reboot.
ISO recommends the PIN option. The PIN can be stored in LastPass and shared securely to other users of the computer. The PIN is separate from a user account password. Follow ISO passphrase guidelines to create a long, secure PIN.
ISO does not recommend the USB option. The USB created should never be left in the computer once the drive has been unlocked and will need to be stored securely in a locked cabinet or drawer. The USB will also not show the file that unlocks the drive, so it will not appear to be different from other USBs and must be labelled.
Suspend BitLocker
For planned updates, hardware changes, or configuration changes, there is an option in the BitLocker menu to suspend BitLocker but not turn it off. Turning off BitLocker is not recommended for temporary situations, as it will decrypt the drive and require the entire process to be repeated to be turned back on.
Recovery Keys
-
With TPM chip: forget your user account password
-
Without TPM chip: lose the USB startup key or forget the decryption PIN
-
Upgrade the operating system
-
Move the encrypted drive to a new computer
-
Install a new motherboard
-
Change the boot configuration settings
-
Update the computer BIOS
Recovery options:
- Plaintext recovery key
- BitLocker can generate a plaintext recovery key that can be typed in manually during recovery.
- (ISO recommended) Copy into a LastPass entry.
- Save to a file and print out. Store the printout in a secure location, such as a locked drawer or cabinet.
- Save to a USB. Store the USB in a secure location, such as a locked drawer or cabinet.
- Every computer owner is responsible for the recovery key to their own device, including owners of campus managed devices. ITCS does not store recovery keys.
- Microsoft Account (personally-owned devices only)
You can access your recovery key options at any time through the BitLocker main menu.
If you ever regenerate the recovery key, make sure you update all of your recovery key backups.
Enable Full Disk Encryption on Apple macOS
FileVault
FileVault provides data and operating system protection for your Mac in the event the computer is stolen or lost. FileVault is available on all Mac computers.
Enabling FileVault will not affect the user experience. Logging in, navigating folders and saving files will all remain the same. Once FileVault is enabled, all data stored on the drive will be encrypted.
Enable FileVault
Enabling FileVault will require administrator privileges. If you do not have administrator privileges on your device, contact IT Client Services or your departmental IT support for assistance.
ISO recommends that you use a standard user account for all day-to-day activities and elevate to admin privileges only when needed. This process can be performed from a standard user account and will prompt for privilege elevation when needed.
Instructions to use FileVault to encrypt your Mac startup disk.
FileVault will encrypt the files for all users of the computer; each user will be prompted to enter their password during setup. If a user is not enabled in FileVault, they will not be able to log in or access their data. User accounts that you add after turning on FileVault are automatically enabled.
Recovery Keys
When you set up FileVault, you will need to choose a recovery option in the event you forget your account password.
Recovery options:
-
Plaintext recovery key
-
FileVault can generate a plaintext recovery key that can be typed in manually during recovery.
-
ISO recommends creating a LastPass entry to store the recovery key. The key can also be copied into a file and printed out. Store the printout in a secure location, such as a locked drawer or cabinet.
-
Every computer owner is responsible for the recovery key to their own device, including owners of campus managed devices. ITCS does not store recovery keys.
-
- iCloud (personally-owned devices only)
- If you store your recovery key in your iCloud account, there's no guarantee that Apple will be able to give you the key if you lose or forget it. Not all languages and regions are serviced by AppleCare or iCloud, and not all AppleCare-serviced regions offer support in every language.
If you want to change the recovery key used to encrypt your startup disk, turn off FileVault in Security & Privacy preferences. You can then turn it on again to generate a new key and disable all older keys. Make sure you update all your recovery key backups.